


Traditional Tuesday Project Idea 
How to create layout:
Trim 1/4" off of all 4 sides of White Cardstock and adhere centered to blue Cheerful Winter Addition Paper .
Cut snowflake paper to 11-1/2" x 6-1/2" and adhere to center of White Cardstock with adhesive applied to bottom and top right of paper. No adhesive is to be applied to left side and left top of paper when placing on the White Cardstock.
Adhere snowflake border sticker to bottom of paper.
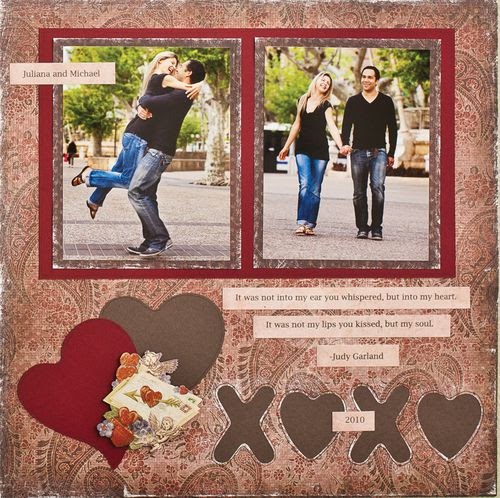
Mat a 6” x 4” photo onto a purple Cheerful Winter Addition photo mat and adhere in center of snowflake paper as shown.
Crop 2nd photo to 3-3/4" x 2-1/2" and mat using green Cheerful Winter Addition Paper.
Adhere to page, sliding under larger photo in a pleasing angle.
To achieve the rolled corner, take upper left corner of snowflake paper and start rolling it downwards. You will want to keep the left hand bottom corner very tightly rolled and allow the top right hand side to
become looser to achieve an asymmetrical look. You may find it helpful to put a slight crease with your finger at the bottom left hand side to hold the roll in place better.
Unroll paper slightly backwards and gently apply adhesive to paper and roll back to desired position. A good trick is to place a pen or pencil inside of the roll to push down of the adhesive and keep it there until it is good and set. Again a slight crease at the top will help it stay in place.
Using a striped photo mat, slide into position under the rolled corner to align all of the edges as shown. Adhere to White Cardstock .
Adhere remaining left and upper part of snowflake paper that was not previously adhered.
Using the Large Circle Pattern (inside of template) and the Red Blade, cut a circle from White Cardstock. Slide under the two photo's and adhere.
Apply title using Simple ABC/123 Stickers (black) placing around the outside of the circle, as shown.
Adhere phrase sticker over photo on right hand side as shown.
Adhere outer circle of Brr.. phrase sticker to blue paper and cut out around the sticker using an All-Purpose Scissors.
Adhere inner portion of circle sticker (got snow) onto green paper and cut around it. Adhere both to page by sliding one under photos and one above photo using Foam Squares, as shown.
Apply snowflake sticker surrounding circle as shown, using Foam Squares.
Using All-Purpose Scissors cut out various snowflake stickers from remaining snowflake paper and adhere them onto white circle with adhesive and Foam Squares.
Using the Tag Maker, punch a tag from White Cardstock. Apply sticker to the top of tag and adhere to blue paper. Use Scissors to cut around the tag, leaving a thin border.
Journal on the tag and slide in under rolled paper.
Create layout using:
Cheerful Winter Addition
White Cardstock
Tag Maker
All-Purpose Scissors
CCS Circle Patterns
Simple ABC/123 Stickers
Foam Squares
Project designed by:
Lori Mancini
 Designed By: Denna de Motta
Ingredients:

Download Freebies By Clicking Here
Freebie Package Includes:
Trim 1/4" off of all 4 sides of White Cardstock and adhere centered to blue Cheerful Winter Addition Paper .
Cut snowflake paper to 11-1/2" x 6-1/2" and adhere to center of White Cardstock with adhesive applied to bottom and top right of paper. No adhesive is to be applied to left side and left top of paper when placing on the White Cardstock.
Adhere snowflake border sticker to bottom of paper.
Mat a 6” x 4” photo onto a purple Cheerful Winter Addition photo mat and adhere in center of snowflake paper as shown.
Crop 2nd photo to 3-3/4" x 2-1/2" and mat using green Cheerful Winter Addition Paper.
Adhere to page, sliding under larger photo in a pleasing angle.
To achieve the rolled corner, take upper left corner of snowflake paper and start rolling it downwards. You will want to keep the left hand bottom corner very tightly rolled and allow the top right hand side to
become looser to achieve an asymmetrical look. You may find it helpful to put a slight crease with your finger at the bottom left hand side to hold the roll in place better.
Unroll paper slightly backwards and gently apply adhesive to paper and roll back to desired position. A good trick is to place a pen or pencil inside of the roll to push down of the adhesive and keep it there until it is good and set. Again a slight crease at the top will help it stay in place.
Using a striped photo mat, slide into position under the rolled corner to align all of the edges as shown. Adhere to White Cardstock .
Adhere remaining left and upper part of snowflake paper that was not previously adhered.
Using the Large Circle Pattern (inside of template) and the Red Blade, cut a circle from White Cardstock. Slide under the two photo's and adhere.
Apply title using Simple ABC/123 Stickers (black) placing around the outside of the circle, as shown.
Adhere phrase sticker over photo on right hand side as shown.
Adhere outer circle of Brr.. phrase sticker to blue paper and cut out around the sticker using an All-Purpose Scissors.
Adhere inner portion of circle sticker (got snow) onto green paper and cut around it. Adhere both to page by sliding one under photos and one above photo using Foam Squares, as shown.
Apply snowflake sticker surrounding circle as shown, using Foam Squares.
Using All-Purpose Scissors cut out various snowflake stickers from remaining snowflake paper and adhere them onto white circle with adhesive and Foam Squares.
Using the Tag Maker, punch a tag from White Cardstock. Apply sticker to the top of tag and adhere to blue paper. Use Scissors to cut around the tag, leaving a thin border.
Journal on the tag and slide in under rolled paper.
Create layout using:
Cheerful Winter Addition
White Cardstock
Tag Maker
All-Purpose Scissors
CCS Circle Patterns
Simple ABC/123 Stickers
Foam Squares
Project designed by:
Lori Mancini
Wintertime Fun - Cheerful Winter Digital Scrapbooking Layout Idea
Ingredients:
- StoryBook Creator Plus 3 Software
- Cheerful Winter 12x12 Additions
- Reminisce Winter Digital Addition
- Cheerful Digital Embellishments
- Bold Block Digital Alpha Shapes
- Fonts: Century Gothic and Mighty to Save
- StoryBook Creator Plus 3 Software
- Cheerful Winter 12x12 Additions
- Reminisce Winter Digital Addition
- Cheerful Digital Embellishments
- Bold Block Digital Alpha Shapes
- Fonts: Century Gothic and Mighty to Save
Freebie Friday - January 2011 Week 4
Download Freebies By Clicking Here
Freebie Package Includes:
- Let it Snow - Designed by Jamie Cripps
- Reminisce Banner - Designed by Jill Klasen
- Knit with love - Designed by Jen Lessinger
- Cold Hands Warm Hearts- Designed by Jamie Cripps
- IMPORTANT: Click on (or right click) the link under the group of images to download the zipped folder containing the high resolution versions of these freebies. Once you've downloaded the embellishment folder to a location on your hard drive, un-zip and save the freebie files. To learn how to add this embellishment to your own collection click here (for SBC 2 Plus) or click here (for SBC 3 Plus) or SBC Studio (Mac). You will then be free to use this embellishment however you like.